AI image editors have an annoying habit: you ask them to fix one small thing, and they cheerfully repaint the entire picture, new problems and all. The fix that finally worked for us wasn't a cleverer description. It was pointing instead of describing: highlight the exact spot on the image, tell the model what to do with it ("remove this," "this face is wrong," "make this green"), and it changes only that spot.
Key takeaways
- Most AI tools "edit" by generating a whole new image from your prompt — that's why everything changes, not just the part you meant.
- To change only one part, use an edit / inpaint / mask mode and highlight the exact region first.
- Write the instruction as a command starting with a verb ("Remove…", "Change… to…") and add "change nothing else."
- Change one thing at a time — stacking edits, or re-rolling the whole image repeatedly, degrades it.
- Highlighting also solves the "which of these two similar people do you mean?" problem — you point at one face, so there's nothing to confuse.
I've spent about nine months building Memolio, a service that turns a grandparent's life story into a printed, illustrated book. Real photos and stories go in; a hand-painted-looking watercolour book comes out, every page generated by AI.
And here is the thing nobody tells you when you start: the AI never gets the whole book right on the first try. It can't. Even the best image models today miss things — a hand with six fingers, a face that drifted, a stray object that shouldn't be there. That's fine, as long as you can fix the misses easily. So for months, the hardest problem I worked on wasn't generating the pages. It was editing them.
I want to share the one change that fixed it, because it's genuinely useful and I couldn't find it written up anywhere for normal people. If you use any AI image tool — Midjourney, ChatGPT, Seedream, whatever — this will save you a lot of frustration.
The problem: AI editors change everything when you only wanted to change one thing
Here's the situation everyone runs into. You have an image that's almost perfect. There's one small thing wrong. So you write a careful instruction describing the fix — something like: "Underneath the framed photograph on the shelf, you can see a pair of legs that shouldn't be there. Please remove them."
You send it. The model regenerates the image. The legs are gone — but now the framed photo is a different photo, the shelf has moved, and one of the people has a slightly different face. You fixed one thing and broke three others.
So you write another instruction to fix the new problems. That regenerates again, and introduces new new problems. This is the trap: every fix is a full re-roll of the dice, and you can get stuck in a loop that only ever gets worse. I watched test users fall into this over and over. (It's not just us — even OpenAI's own guidance notes that ChatGPT quietly generates a new image rather than editing yours, and that quality drops after a handful of re-rolls.)
It gets worse when two characters look similar. If a book has, say, two men with brown hair, the model constantly struggles to remember which face belongs to which person. Describe a fix to one of them in words and there's a real chance the model "corrects" the wrong man, or blends the two faces together. You cannot reliably fix that by typing more adjectives.
The fix: stop describing the problem, start pointing at it
The breakthrough was embarrassingly simple. Instead of describing where the problem is in words, you highlight it directly on the image.
You paint over the exact spot with your finger or mouse — like using a highlighter on a page — and then you tell the model what to do with that spot:
- "Remove this."
- "This face doesn't look like the character — fix it."
- "Change this to a green jacket."
The model now receives two things: the picture and a mark showing exactly where to look. It no longer has to guess what "the legs under the framed photo" means, or which of two similar men you're talking about. You've pointed. It looks where you pointed, changes only that, and leaves the rest of the image alone. It works an absolute treat.
This isn't magic — and it isn't new (but almost nobody explains it)
I want to be honest: I did not invent this. People who use node-based tools like ComfyUI have been doing a version of it for years — it's usually called inpainting, where you "mask" a region of the image and regenerate only inside the mask. There's even a 2025 academic study from the CHI conference that tested this properly: they had designers refine AI images using text, versus drawing annotations and scribbles directly on the picture. The finding, in plain English: people were better and happier pointing at the image than describing it in words — annotations won for anything spatial ("this bit, here"), and text was only better for open-ended creative changes.
So the idea is established. What I couldn't find anywhere was a plain, example-led explanation for people who don't want to learn a node graph. So here's how it actually works, kept simple. When you highlight a spot and give an instruction, the tool sends the image model three things:
- The current picture — not a blank canvas. The model starts from what you already have.
- A marked-up copy showing your highlighted region.
- A short, firm instruction about what to do there.
The model — we use Seedream 4.5, which has a strong "edit this image" mode — then repaints only the marked area and blends it back in. Because it's working from your existing image instead of generating a new one from scratch, everything you didn't highlight stays put.
The lesson that made it reliable: use verbs, not nouns
One hard-won detail, because it'll save you a headache. When we first built this, our instructions were too polite. We'd send the model a noun phrase — "the legs," "his hair" — as if naming the problem was enough. The model would treat that as a vague suggestion and barely change anything, or nudge the colour instead of removing the object.
The fix was to write instructions as commands, starting with a verb, and to explicitly protect the rest of the image:
- ❌ "the legs under the shelf"
- ✅ "Remove the legs completely. Rebuild the wall behind them. Change nothing else."
That last sentence — change nothing else — matters more than you'd think. Say what to do, say it as an order, and tell the model to leave everything else alone. Once we did that, the edits became dramatically more dependable.
The "which face is which" problem, solved
This is my favourite example, because it's the case that used to be nearly impossible. Here's a page from a book about two men who met in a garage band. Two men, similar age, both with dark hair — exactly the situation that makes AI models lose track of who's who.
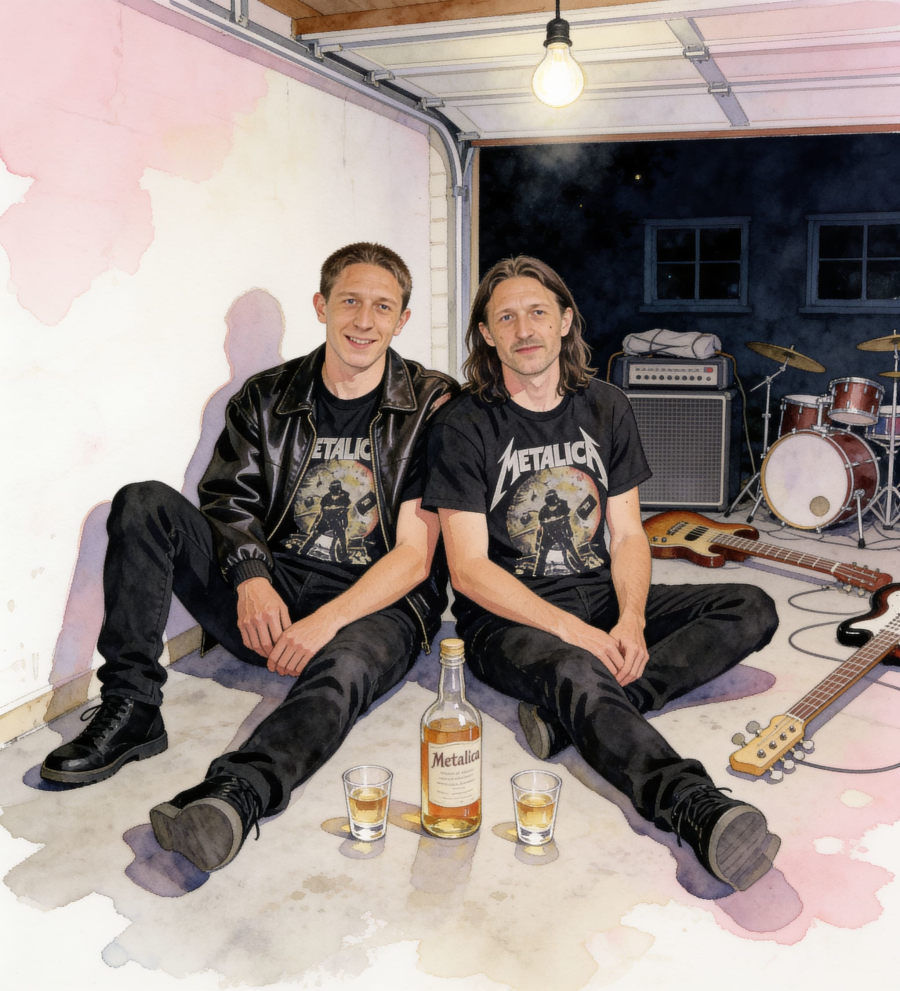
In the old world, I'd describe that in words and pray the model didn't "fix" the man on the right instead. Here's the choice, side by side. On the left: the tempting shortcut — regenerate the whole page. On the right: highlight just the face.
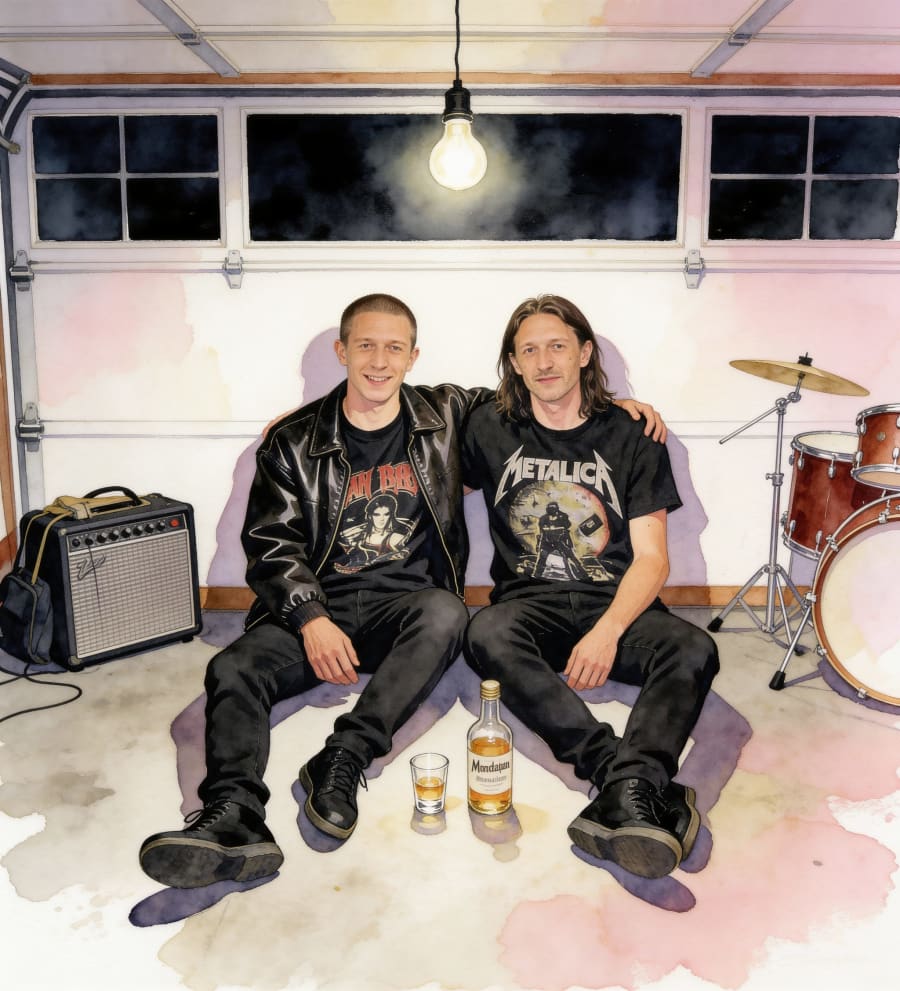
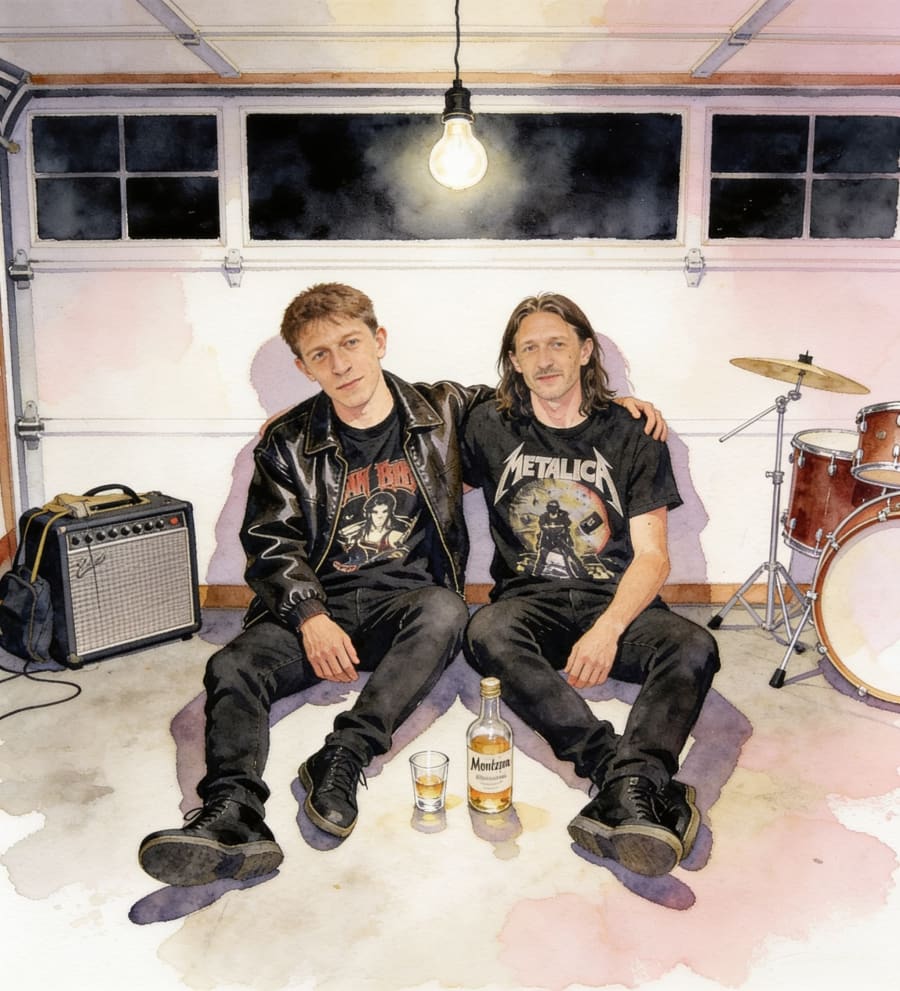
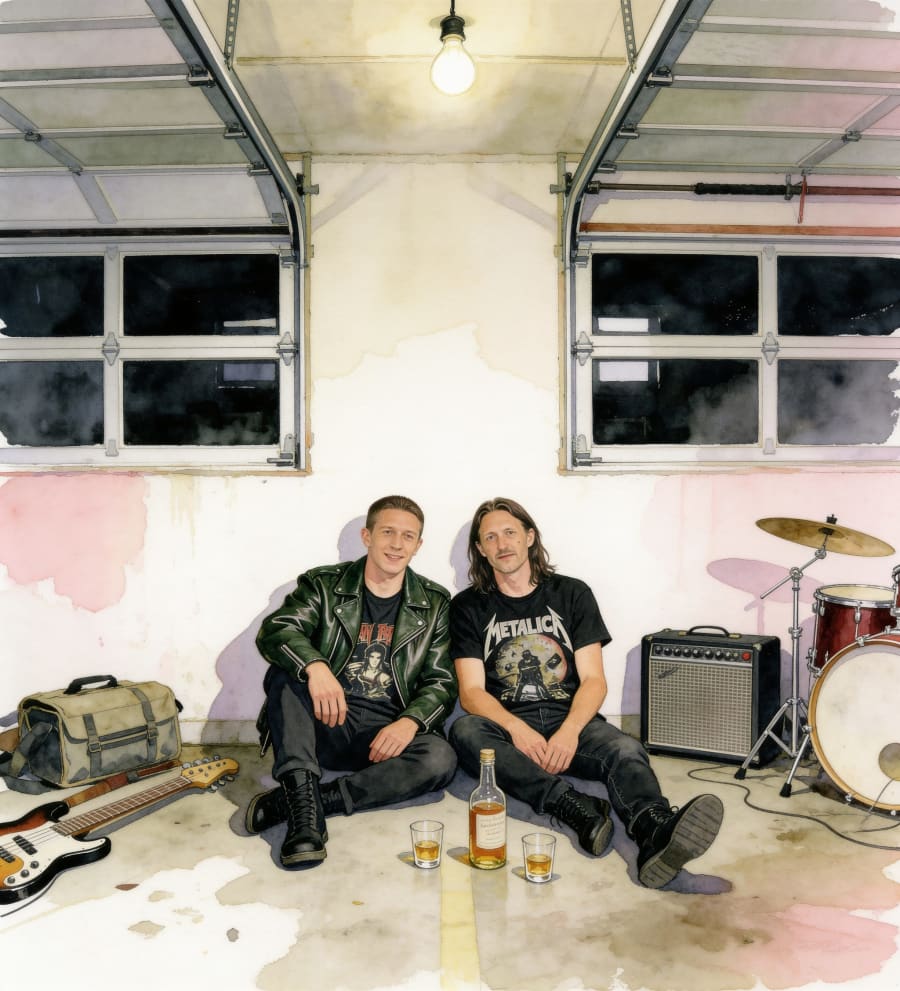
Because I pointed at his face specifically, there was no confusion about which of the two men to fix, and no collateral damage. And once you have this tool, other edits become trivial. Want to change just his jacket? Highlight the jacket, say "make it a green leather biker jacket":
How to do this yourself, on any AI image tool
You don't need our app to use the technique. The principle transfers anywhere:
- Start from the image you have, not a new prompt. Use the tool's "edit," "inpaint," or "mask" mode — not a fresh generation. (In ChatGPT's image tools you can even upload the image and draw on it; in ComfyUI it's the Mask Editor; in Photoshop it's Generative Fill with a selection.)
- Mark the exact spot you want changed. A rough highlight is fine — you're pointing, not tracing.
- Write the instruction as a command, starting with a verb. "Remove…", "Replace… with…", "Change… to…".
- Add "change nothing else" so the model protects the rest of the image.
- Change one thing at a time. Fix, look, then decide the next fix. Don't stack five changes into one instruction.
That's it. The mental shift is the whole thing: don't tell the AI what's wrong, show it where.
Why we care about this so much
Most of our customers are not technical. They're people making a book for their mum, their grandad, their partner. If fixing a wonky face means writing a perfect paragraph of image-editing jargon, they'll give up — and rightly so. Highlighting turns "describe the problem precisely enough for a machine" into "point at the bit you don't like." That's a thing anyone can do, and it's the difference between a book people finish and a book people abandon.
FAQ
Why does AI change the whole image when I only want to fix one small part?
Because most tools "fix" things by generating a brand-new image from your instruction, rather than editing the one you have. Anything you didn't explicitly lock down is fair game to change. The solution is to use an edit or inpaint mode that works from your existing image and to restrict the change to a highlighted region.
Why does ChatGPT change my whole image when I only ask for a small fix?
Because ChatGPT doesn't edit your image — it reads it and generates a new one from your request, so faces, background and details shift each time. Make one small, specific change per message rather than several at once, and where possible select or draw on the exact area you want changed so the rest is left alone. Quality also degrades if you keep re-generating the same image many times, so after a few rounds you're better off starting from a clean version.
How do I edit only one part of an AI image?
Use the tool's edit, inpaint or mask mode. Highlight the exact area you want changed, then give a short command describing the change and add "change nothing else." The model repaints only the marked area and leaves the rest alone.
How do I keep a character's face the same across AI images?
Give the tool a clear reference photo of the person, well-lit and face front-on or three-quarter, and change only one thing at a time. When a face drifts anyway, don't regenerate the whole scene — highlight just that face and fix it against the reference, which keeps the rest of the image intact and stops the model confusing two similar-looking people.
Why does AI keep merging or swapping two people's faces?
When two characters look similar, text descriptions aren't enough for the model to tell them apart, so it guesses and sometimes fixes the wrong person or blends them. Highlighting the specific face you mean removes the guesswork: you're pointing at one person, so there's nothing to confuse.
What's the difference between this and inpainting?
They're the same core idea. Inpainting is the technical term for regenerating only a masked region of an image. Highlighting-to-edit is just inpainting made simple enough that you don't need a node editor to do it.
Which AI model is best for editing an existing image?
For a watercolour style we use Seedream 4.5, which has a strong image-edit mode. But the technique — highlight the spot, command the change, protect the rest — works across most modern editors, including ChatGPT's image tools, Photoshop's Generative Fill and ComfyUI.
Do I need to be good at writing prompts?
No. That's the whole benefit. Instead of describing where a problem is in careful words, you point at it on the picture. A short command such as "remove this" is all you need.